Setup and Provisioning
After completing physical installation and powering up the controller for the first time, you can now navigate the menus and configure the system parameters as required.
Controls
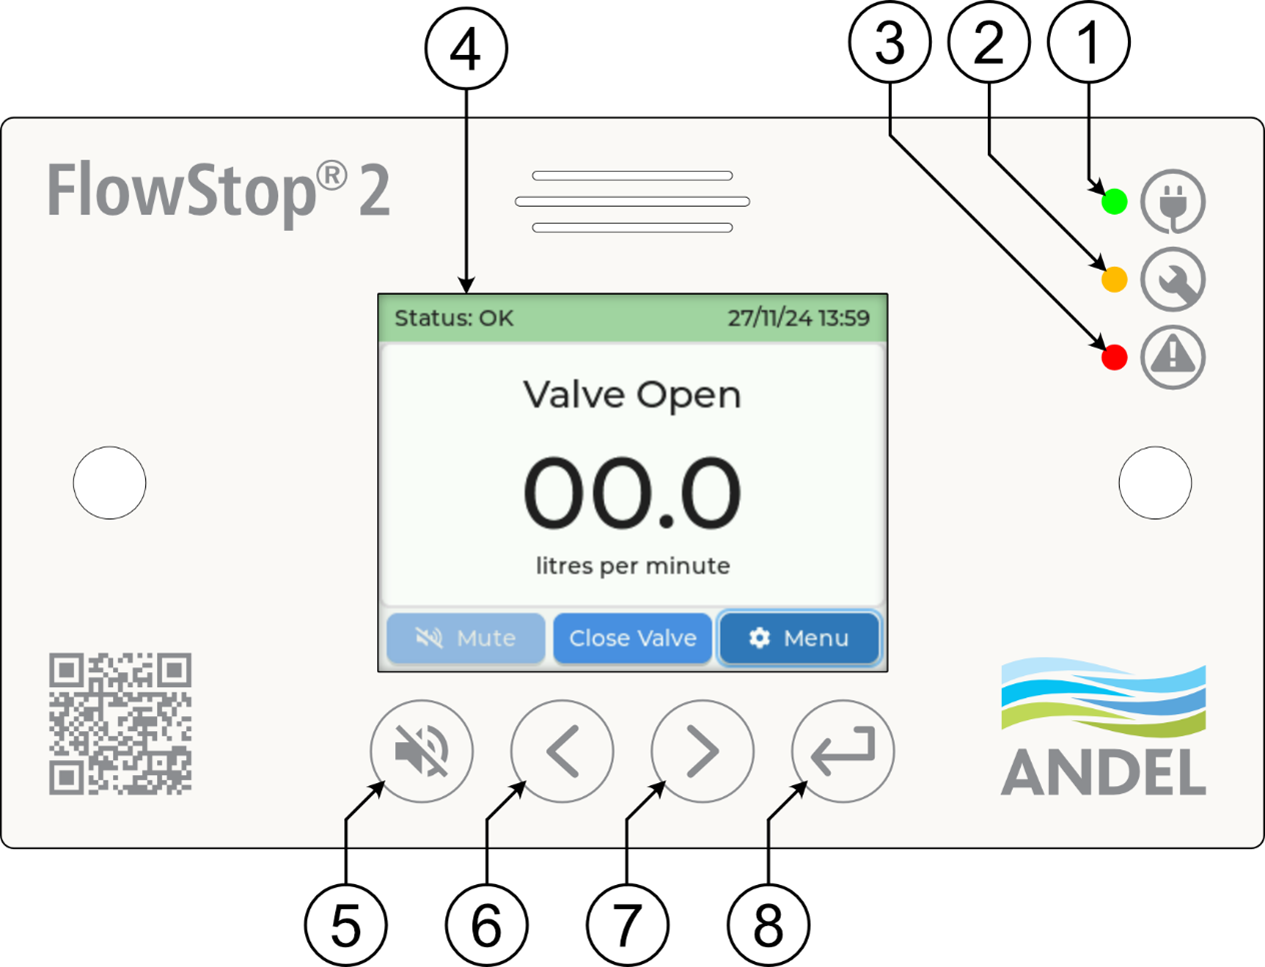
| No. | Key | Name | Purpose |
|---|---|---|---|
| 1 | Power LED (green) | Always on when power is connected | |
| 2 | Service LED (amber) | Turns on when system is in a non-standard state, or the system detects a fault | |
| 3 | Alarm LED (red) | Flashes when system has detected a leak or fault and is in alarm | |
| 4 | Display | Shows status, flow rate, alarms, and menus | |
| 5 | Mute key | Muting alarms, menu navigation (back / cancel) | |
| 6 | Left key | Menu navigation (left / up), decrease values | |
| 7 | Right key | Menu navigation (right / down), increase values | |
| 8 | Enter key | Menu navigation (select / confirm) |
Navigating the Interface
- The
 left key and
  right key move the selection left / up and right / down respectively.
 - The
 enter key selects or confirms the currently highlighted option.
 - The
 mute key:
- On the main screen, mutes any active alarm.
- In menus, deselects the current item or returns to the previous menu.
- When pressed and held for 10 seconds, reboots the system. This will not clear any active alarms but will briefly open and close the valve(s).
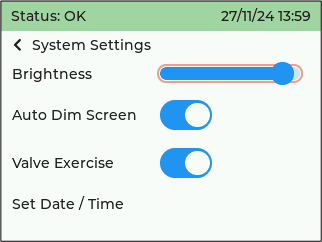
Using Sliders
Some options such as brightness are adjusted via a slider.
- Use the left and right keys to highlight the slider.
- Press enter to begin editing (red outline).
- Adjust the value with the left and right keys.
- Press the mute key or the enter key to confirm the value and exit the slider.
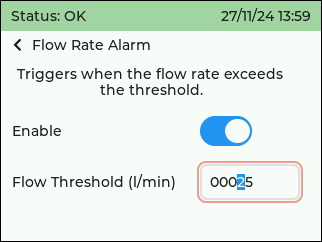
Using Spinboxes
Other settings are controlled using a spinbox, as shown in the image below.
- Use the left and right keys to highlight the spinbox.
- Press enter to start editing. The highlighted digit is the one being adjusted.
- Press enter again to move between digits.
- Use the left and right keys to decrease or increase the highlighted digit.
- Press mute or press and hold enter to confirm the value and exit the spinbox.
Factory Reset
A factory reset function can be found in the “About This Device” menu. This will reset all valve, alarm, relay, and system settings to their factory default values, clear all active alarms, and clear the alarm history. This will not reset the system time.
Andel Cloud
TODO
Menu Structure
Below is a diagram of the menu for FlowStop 2, showing how to find the settings for each feature.
Main Menu
 ├─ Valve Settings & Alarms
 │   ├─ Valve 1
 │   │   ├─ Settings
 │   │   └─ Alarms
 │   │       ├─ Flow Rate Alarm
 │   │       ├─ No Flow Alarm
 │   │       ├─ Flow Duration Alarm
 │   │       └─ Flow Volume Alarm
 │   └─ Valve 2
 │       ├─ Settings
 │       └─ Alarms
 │           ├─ Flow Rate Alarm
 │           ├─ No Flow Alarm
 │           ├─ Flow Duration Alarm
 │           └─ Flow Volume Alarm
 ├─ General Alarms
 │   ├─ Leak Sensor Alarm
 │   └─ Temperature Alarm
 ├─ Alarm Override
 ├─ Output Relay Settings
 │   ├─ Relay 1
 │   └─ Relay 2
 ├─ System Settings
 │   └─ Set Date/Time
 ├─ Alarm History
 └─ About This Device
     └─ Factory Reset
Settings
The FlowStop comes preconfigured with settings that should be suitable for a range of different use cases. Please check through all these settings to ensure that the FlowStop is configured to best protect your property.
System Settings
These settings relate to the system as a whole.
- Brightness – controls the display backlight brightness
- Auto Dim Screen – automatically reduces the backlight brightness to its minimum level after 5 minutes without any interaction. The system will return to normal brightness upon any interaction or alarm being triggered.
- Valve Exercise – automatically closes and opens the valve(s) for 10 seconds at 3:00 AM each day to prevent limescale buildup. Relies on the system time being set for accurate timing. Will not trigger if any water is being used or if any alarms are active.
- Set Date / Time – menu for setting the system time.
Valve Settings
These settings relate to each individual valve unit. * Enable Valve – allows control of the valve and monitoring of its respective flow sensor. Disabled valves will not trigger any alarms. * Valve Invert – swaps the polarity of the valve toggle. Only necessary if the valve wires have been switched.
Alarm Settings
Please see the dedicated Alarm Settings page.
Other Features
Alarm History
The most recent alarms and their cause are stored on the control unit.
In most cases, the measured value that triggered the alarm will also be shown.
Alarm Override
The alarm override feature allows you to set the system to ignore all flow sensor related alarms for up to 12 hours. Note that this will not disable any leak sensor related alarms.
This is useful for filling pools, extended garden watering sessions, and other periods of high water use that would otherwise trigger an alarm and shut off the water supply.
To use the alarm override:
- Navigate to the Alarm Override screen through the menu system
- Set the duration you wish to override the alarms for (1-12h)
- Click enter on the start button
- You will see the service light turn on and the top banner turn orange with a countdown timer. Flow related alarms (flow rate, flow duration etc.) will not trigger while the override is active.
- The override can be ended at any time on the main screen or in the alarm override menu. When the timer expires, the system will return to its normal state of operation.